TOOLS OF THE TRADE
Every successful potion begins with careful preparation. Potion making is a very delicate task, and as such, you will not do well if you simply rush straight into it.
First off, potion making requires a specific set of tools in order to be effective and efficient. The very first thing you will need in order to brew a potion is a cauldron.
Cauldrons come in many shapes, sizes, and materials. The cauldron you are required to have for this class is a standard size two pewter cauldron. If you choose to pursue the study of potions in your upper years, you may be allowed to use a different cauldron.
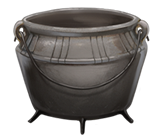
Pewter is the recommended material for starter cauldrons because it can stand up to a large amount of use and the widest variety of potions. Pewter is also fairly resistant to heat, and as such, temperatures for potions do not need to be watched as carefully while brewing in a pewter cauldron. Thus, pewter cauldrons are most effective for brewing potions which have a long brewing period, such as the Polyjuice Potion.
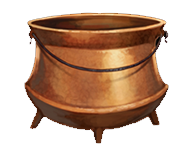
Copper is another type of material for cauldrons. Copper cauldrons are very efficient at brewing, as they channel both magic and heat very well. In addition, they can handle higher-quality ingredients such as unicorn horns with ease. However, copper cauldrons are among the most "sensitive" cauldrons. They need to be watched nearly constantly to ensure they do not melt. As such, copper cauldrons are good for brewing high-quality potions with a mid-to-small brewing time, such as Amortentia.
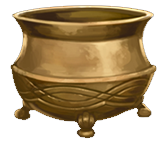
Cauldrons can also be made of brass. Brass cauldrons offer a nice mid-point between pewter and copper; they are more resilient than copper, but more efficient than pewter. As such, most potion-makers upgrade to brass cauldrons once they have mastered the basics of brewing (though they often keep their pewter cauldrons for those long-brewing potions!)
Though used far less often, gold and silver are also possible materials for cauldrons. These cauldrons are excellent for brewing higher quality and more complicated potions, though they also require a watchful eye like the copper cauldrons. Some professional potion makers swear that, for proper potion making of advanced potions, these cauldrons are essential. However, since we are dealing with only basic potion making in this class, we will move on to types of cauldrons.
Standard cauldrons are self-explanatory. They are the regular types of cauldrons you carry around, and they don't do much else. They are well-suited for all types of potions.
Self-stirring cauldrons will, of course, stir themselves. They were invented by Gaspard Shingleton, who is featured on Wizard Card #54. They are well-suited for potions which require lots of stirring, stirring at specific times that a witch/wizard may not be able to make, and long-brewing potions. However, they require a somewhat advanced knowledge of magic and potion making to use properly.
Collapsible cauldrons are capable of being folded for easy storage and transport. However, the integrity of the cauldron is compromised for this feature, so collapsible cauldrons are not to be used for highly corrosive potions or potions requiring high heat.

You will also require phials in order to brew a potion. You may use crystal or glass phials. There is very little difference between glass and crystal phials; mainly the different types are used purely for aesthetic purposes. Phials are used to hold your various potion ingredients. Some ingredients are sold in phials, such as gaseous or liquid ingredients. Phials can also be used to hold small amounts of potions. In this class, you will be required to collect your ingredients from the classroom (or the grounds, in some cases) prior to brewing your potion, and you will store them in your phials. I strongly suggest you prepare and measure them according to the potion we are brewing and then store them in your phials. This way you will have less to do while brewing the potion, and thus less to worry about and less room for error. In addition, when you turn in samples of your potions for grading, you will be required to store them in phials labelled with your name and house on them.
There are a few other tools you will need for potion making. Ingredients in potions are often measured by weight. As such, you will need scales to measure out certain amounts of ingredients. Almost all scales are made of brass. A knife is another tool used for potion-making, and most potion-makers use silver knives. The silver knife is used to cut ingredients precisely and without tainting them. Sometimes you will need to grind or crush ingredients for your potion as well, in which case you will use a mortar and pestle.
Finally, you will need your specific potion ingredients, your potion recipe, and your wand. Many wizards and witches are unaware how heavily potion making relies on magic. If, by some odd chance, a Muggle were to come across the ingredients, tools, and recipe required to brew a potion, they would still find that their potion would not brew properly and it would not have any magical effect on the drinker. This is because potion making does, in fact, require magic. Some potions will require you to wave your wand over the cauldron, while others will not. Regardless, the presence, care, and touch of a magical person are enough to bind the ingredients and bring about the desired effect. The two required textbooks for this course are One Thousand Magical Herbs and Fungi, which we will look over next lesson, and Magical Drafts and Potions. Magical Drafts and Potions will contain all of the potion recipes you will need for your basic Potions lessons at Hogwarts, and will be an excellent reference for you if you continue to study potions. It also discusses some of the potion ingredients we will encounter this term. It was written by Arsenius Jigger. If you did not purchase a copy, you can find one in the Hogwarts Library.
We will finish our class with the basic steps for potion brewing. I advise you to commit these to memory, but also to remember that some potions may require extra steps, omitting steps, or different steps altogether.
1. Read the potion recipe carefully!
2. Gather the necessary ingredients.
3. Cut, measure, and otherwise prepare your ingredients (and store them in phials if needed).
4. Set up your brewing station. The space should be free of all clutter and unnecessary items. None of the tools should be too close to each other. Make sure you are able to change the height of the fire beneath the cauldron with ease.
5. Prepare the phial or bottle you will be keeping your potion in. Place it on your station.
6. Check the recipe... again! Once you're sure you have everything you need, begin following the instructions. Consistently refer back to them as you complete each step (or couple of steps, if you have a good memory) - potion making really is an exact art, so if a recipe says to "Heat for 5 seconds", it means it! 6 seconds could result in a ruined potion, so keep on your toes and KNOW YOUR RECIPE!
7. Follow the instructions for transporting your finished potion into its container. (Some potions allow you to use a ladle/spoon, others advise you to dip the bottle/phial right in, some require your wand, etc.)
8. Clean up your station! And clean off your tools/cauldron! I get very grumpy when students leave their brewing stations all messy at the end of class...
